Showing posts with label How-To. Show all posts

Friday, 22 March 2013

Displaying related posts is a smart way for keeping your site visitors around and with thumbnails it is even smarter!This widgets is one of most popular way to increase to show related post to blogger.After you will add this widget it will start above comment section.The related articles are chosen from other posts in that same category/label/tag.Related post widget help you to show visitor your past and previous stories.It also help to increase page and make readers engaged on reading your blog post.


Features


  • Responsive Design
  • Fast Loading And SEO Friendly.
  • Shows Post of  same category/label/tag.
  • Blog Post Title with Thumbnail.
  • Easy to Install.

Add This Widget To Blogger


  • Go To Blogger Dashboard
  • Click On Template Tab
  • Now Click On Edit HTML>>Proceed.
  • Check the "Expand widgets template"
  • Now Find ]]></b:skin>
  • Paste Below Code Above ]]></b:skin>
#related-posts {
float:center;
text-transform:none;
height:100%;
min-height:100%;
padding-top:5px;
padding-left:5px;
}
#related-posts h2{
font-size: 18px;
letter-spacing: 2px;
font-weight: bold;
text-transform: none;
color: #5D5D5D;
font-family: Arial Narrow;
margin-bottom: 0.75em;
margin-top: 0em;
padding-top: 0em;
}
#related-posts a{
border-right: 1px dotted #DDDDDD;
color:#5D5D5D;
}
#related-posts a:hover{
color:black;
background-color:#EDEDEF;
}

  • Now Find </head> And Paste Below Code Above it
<b:if cond='data:blog.pageType == &quot;item&quot;'>
<script type='text/javascript'>
var defaultnoimage=&quot;https://blogger.googleusercontent.com/img/b/R29vZ2xl/AVvXsEiCShT3-K-g2HxcbF2TPjjaeQw4NIpwM7QrVpOYvjlquRZivtG4-54CHn2SxuajcnB1UsJFxMrSLsp9PtD5VShZtVjlV2MAmwoBl5e7Vp1TGn8aFv4o1wKw7VHANULYqYnHpNq9gUwMjeST/s1600/no_image.jpg&quot;;
var maxresults=5;
var splittercolor=&quot;#DDDDDD&quot;;
var relatedpoststitle=&quot;Related Posts&quot;;
</script>
<script src='http://helplogger.googlecode.com/svn/trunk/related-posts-with-big-thumbnails.js' type='text/javascript'/>
</b:if>

  • Now Find  <div class='post-footer'>
  • And just above it, copy and paste the below code
<b:if cond='data:blog.pageType == &quot;item&quot;'>
<div id='related-posts'>
<b:loop values='data:post.labels' var='label'>
<b:if cond='data:label.isLast != &quot;true&quot;'>
</b:if>
<script expr:src='&quot;/feeds/posts/default/-/&quot; + data:label.name + &quot;?alt=json-in-script&amp;callback=related_results_labels_thumbs&amp;max-results=6&quot;' type='text/javascript'/></b:loop>
<script type='text/javascript'>
removeRelatedDuplicates_thumbs();
printRelatedLabels_thumbs(&quot;<data:post.url/>&quot;);
</script>
</div><div style='clear:both'/>
<!-- remove --></b:if>
<b:if cond='data:blog.url == data:blog.homepageUrl'><b:if cond='data:post.isFirstPost'>
<a href='http://lordhtml.blogspot.com'></a>
</b:if></b:if>

Finally After Adding Lot of code just click on Save Template button and preview this widget on your blog. 

customization

There is not lot of customization in this widget.If you want to manage no. of post display as related post in your blog then customize red color highlighted code.

Sunday, 17 February 2013

Social media plays an important role in improving any blog's SEO.That's why you may watch social media gadgets almost on every blog/website.If you have enough number of subscribers on social sites then just automatically publish your posts on social sites and get the traffic.Today I am giving a tutorial about automatically posting on facebook,twitter and some other social sites with using dlvr.it service which is free of cost.I am also using this service to publish my blogger posts facebook and twitter.The reason behind to choose dlvr.it is it is very easy to use and install.You can on-off auto publishing anytime and very easily.Lets see how to use it.


Automatically Publish Blogger Posts On Social Sites


  • First go to dlvr.it
  • Signup with giving your email address and choosing password.


  • Now go to your inbox and confirm your email address first
  • You will redirect to another page here you have to provide your feeds address in below format


http://feeds.feedburner.com/FEEDBURNER USERNAME HERE


  • Click on twitter icon and you will redirect to twitter
  • Give your twitter's profile's username and password and hit "Authorize App" button.Now your posts will automatically publish on twitter.


  • Now click on facebook icon.


  • You will redirect to facebook page.Log in to your facebook account from which you are managing your fanpage and select your fanpage.
  • Customize your services as you wish and save your changes.
That's all about auto posting on social networking.If you know more services then share it using contact form below..

Friday, 15 February 2013

You have seen many mind blowing widgets on wordpress blogs but its now time to make Blogger a better place! Presenting to you just another beautiful and yet useful widget that displays the current number of your blog subscribers, twitter and facebook followers. This widget is based solely on pure CSS and HTML with no JavaScript involved therefore you just need to update the counts manually. At present I am learning programming too so as soon as I develop some good command in programming, I will automate all MBT widgets but at present bear with me as a designer only :p

Take a look on how the widget will look like on a blog with narrow sidebar (The screenshot above is taken on a blog with wide sidebar)

Follow the Steps Below To Add The Follower Counter To Your Blogger Blogs

  1. Go To Blogger > Layout
  2. Choose Add a Gadget or Add a Page element
  3. Select HTML/JavaScript widget
  4. Paste the code below inside it,
<style>
.rss-mbt {
    background: url(https://blogger.googleusercontent.com/img/b/R29vZ2xl/AVvXsEh7lMhDyebM_r8yLB5_rfYuWTKTE5LK3me1QyrcYgZLAtjFYcJxEviWRKhBNHCJO-6qQNA9ckYMP99ZHHIpo0AII0vsBqEKi1avKlw4IorDtSMIvbIWSv3tzJTmPEDDlBpl9TNLMooi74Y/s800/RSS1.png) no-repeat;
    height: 64px;
    padding: 0px 20px 0px 80px;
    margin-top: 20px;
}
.twitter-mbt {
    background: url(https://blogger.googleusercontent.com/img/b/R29vZ2xl/AVvXsEjx7BVgZFdFoSoBg7LHUjrmJq3xYASoCLtmvZuxMB1EvuH0_rBGWjyOYXLP7gX_XwWU9EUcEMlVKb_-5jz5aKTA5mf7TArhPlTXaQ0UVb_y1VdxkQWecsL7nObFg8BQv6AfVtWc3ibEa4Y/s800/TWITTER1.png) no-repeat;
    height: 64px;
    padding: 0px 20px 0px 80px;
    margin-top: 20px;
}
.facebook-mbt {
    background: url(https://blogger.googleusercontent.com/img/b/R29vZ2xl/AVvXsEge5k5CLaFw9Pb076pwV9kjw9JoKXIbLzSeXnCi6EsXO8a6gympuHGL_4cCVYwzywcGWyXmx6rUtJR0n_ULYztoYTr-T5cji2sXynuBzP0KLdTneZkpAsjeq5GN9285I7lCfyJ9jcDH9ko/s800/FACEBOOK1.png) no-repeat;
    height: 64px;
    padding: 0px 20px 0px 80px;
    margin-top: 20px;
}
.follower-rss, .follower-twitter, .follower-facebook {
    font-family: Georgia,  sans-serif, Times;
    font-size: 1.1em;
        font-style:italic;
        color:#289728;
}
.follower-rss span {
    font-size: 1.9em;
    font-weight: bold;
        font-style:italic;
        color:#FFB93C;    
}
.follower-twitter span {
    font-size: 1.9em;
    font-weight: bold;
        font-style:italic;
        color:#6DB6E6;    
}
.follower-facebook span {
    font-size: 1.9em;
    font-weight: bold;
        font-style:italic;
        color:#3889BA;    
}
</style>
<div class="rss-mbt">
<div class="follower-rss"> <span>515</span> loyal readers
</div>
<a href="ADD-RSS-FEED-URL-HERE" rel="nofollow">RSS feed</a>
| <a href="ADD-RSS-EMAIL-FEED-URL-HERE" target="_blank" rel="nofollow">E-mail</a>
</div>
<div class="twitter-mbt"><div class="follower-twitter"><span>1058</span> followers</div>                           
<a href="ADD-YOUR-TWITTER-URL-HERE" target="_blank" rel="nofollow" title="I definitely follow you back">Follow us on Twitter!</a>
</div>                       
<div class="facebook-mbt">                       
<div class="follower-facebook"><span>260</span> followers                            </div>                           
<a href="ADD-YOUR-FACEBOOK-URL-HERE" target="_blank" rel="nofollow">Join us on Facebook!</a>
</div>

NOTE:- Make sure to replace the bolded text with the required details (links of your Feedburner, twitter and facebook accounts) and replace the bolded numbers with your current follower counts. For example replace 515  with your current number of Subscribers, replace  1058 with the number of your twitter followers and replace 260 with the number of your facebook followers
     5.    Save and you are done! Now view your blog to see a stunning widget hanging on your sidebar :D

Customization:

I hope it was not difficult to add :). You can replace the images used in this widget with the image links of your choice.
 Kindly let me know how useful do you find this new stylized widget. I would be more than happy to help you with any query you may have. Take good care of your selves and of your dearest ones. Enjoy! :>
Now here is a wonderful hack for displaying related posts beneath each of your blog posts, along with thumbnails. The related articles are chosen from other posts in that same category/label/tag. With this hack many of your readers will remain on your site for longer periods of time when they see related posts of interest.
Steps adding the Related Posts Widget to Blogger/Blogspot

Step 1. Go To Blogger Dashboard >> Template >>Edit HTML;

Step 2. Check the "Expand widgets template" box;

Step 3. Search (CTRL + F) for this piece of code:


</head>

Step 4. And Copy the below code and paste after </head>


<!--Related Posts with thumbnails Scripts and Styles Start-->
<!-- remove --><b:if cond='data:blog.pageType == &quot;item&quot;'>
<style type='text/css'>
#related-posts {
float:center;
text-transform:none;
height:100%;
min-height:100%;
padding-top:5px;
padding-left:5px;
}

#related-posts h2{
font-size: 18px;
letter-spacing: 2px;
font-weight: bold;
text-transform: none;
color: #5D5D5D;
font-family: Arial Narrow;
margin-bottom: 0.75em;
margin-top: 0em;
padding-top: 0em;
}
#related-posts a{
border-right: 1px dotted #DDDDDD;
color:#5D5D5D;
}
#related-posts a:hover{
color:black;
background-color:#EDEDEF;
}
</style>
<script type='text/javascript'>
var defaultnoimage=&quot;https://blogger.googleusercontent.com/img/b/R29vZ2xl/AVvXsEiCShT3-K-g2HxcbF2TPjjaeQw4NIpwM7QrVpOYvjlquRZivtG4-54CHn2SxuajcnB1UsJFxMrSLsp9PtD5VShZtVjlV2MAmwoBl5e7Vp1TGn8aFv4o1wKw7VHANULYqYnHpNq9gUwMjeST/s1600/no_image.jpg&quot;;
var maxresults=5;
var splittercolor=&quot;#DDDDDD&quot;;
var relatedpoststitle=&quot;Related Posts&quot;;
</script>
<script src='http://helplogger.googlecode.com/svn/trunk/related-posts-with-big-thumbnails.js' type='text/javascript'/>
<!-- remove --></b:if>
<!--Related Posts with thumbnails Scripts and Styles End-->

Note:
- to change the default picture, replace the URL in blue with your own
- for displaying more than 5 posts, replace 5 value from "var maxresults=5;"
- remove the code in violet if you want the related posts to be displayed in homepage too

Step 5. Now find the following code:

    <div class='post-footer'>

Step 6. And just above it, copy and paste the below code:

<!-- Related Posts with Thumbnails Code Start-->
<!-- remove --><b:if cond='data:blog.pageType == &quot;item&quot;'>
<div id='related-posts'>
<b:loop values='data:post.labels' var='label'>
<b:if cond='data:label.isLast != &quot;true&quot;'>
</b:if>
<script expr:src='&quot;/feeds/posts/default/-/&quot; + data:label.name + &quot;?alt=json-in-script&amp;callback=related_results_labels_thumbs&amp;max-results=6&quot;' type='text/javascript'/></b:loop>
<script type='text/javascript'>
removeRelatedDuplicates_thumbs();
printRelatedLabels_thumbs(&quot;<data:post.url/>&quot;);
</script>
</div><div style='clear:both'/>
<!-- remove --></b:if>
<b:if cond='data:blog.url == data:blog.homepageUrl'><b:if cond='data:post.isFirstPost'>
<a href='http://helplogger.blogspot.com'><img alt='Blogger Tricks' src='https://blogger.googleusercontent.com/img/b/R29vZ2xl/AVvXsEg1FL1n-LxJg-_ZF195cljDlMIEuONYtUNZiajYcToezKNy7Nb-ZCYG41DUVCn6_vYzmwIVRmT2Yf_aR7ftZfeI_tsm05MXrPXYo8656hKR36seFJsQc9bObM2VTijKYpEiBigoTemavT2L/s1600/best+blogger+tips.png'/></a>
</b:if></b:if>
<!-- Related Posts with Thumbnails Code End-->

Note:
- change the 6 value from max-results=with the number of posts you want to be displayed.
- If you want the related posts to be displayed on homepage too, remove the code in violet.

Step 7. Save the Template

Enjoy :)
In the last tutorial, i've been talking about the Related Posts widget that shows related posts along with thumbnails just at the end of your blog articles. Some of the users, however, would prefer a simpler and cleaner displaying of their related posts so that it would show just the posts titles. So let's begin adding it!


How to add Related Posts Widget to Blogger

Step 1. Go to Template >> Edit HTML and tick the "Expand Widget Templates" checkbox

Step 2. Find the below tag


</head>

Step 3. And Copy the below code and paste after </head>


<!--Related Posts Scripts and Styles Start-->
<!--Remove--><b:if cond='data:blog.pageType == &quot;item&quot;'>
<style type='text/css'>
#related-posts {
float:center;
text-transform:none;
height:100%;
min-height:100%;
padding-top:5px;
padding-left:5px;
margin-top: 20px;
}
#related-posts .widget{
padding-left:6px;
margin-bottom:10px;
}
#related-posts .widget h2, #related-posts h2{
font-size: 17px;
font-weight: normal;
color: black;
font-family: Arial Narrow;
margin-bottom: 0.75em;
padding-top: 0em;
}
#related-posts a{
font-size:16px;
color: #555555;
font-variant:small-caps;
}
#related-posts a:hover{
text-decoration: none;
color: #ffffff;
font-weight: bold;
}
#related-posts ul{
list-style-type:none;
margin:0 0 0px 0;
padding:0px;
text-decoration:none;
text-color:#000000
}
#related-posts ul li{
list-style-type: none;
border-left: 2px solid #1399CF;
border-bottom: 1px dotted #1399CF;
margin-bottom: 3px;
padding-left: 30px;
padding-top:0px;
}

#related-posts ul li:hover{
background-color: #1399CF;
border-left: 2px solid #B3CA3D;
border-bottom: 1px dotted #B3CA3D;
}
</style>
<script type='text/javascript'>
var relatedpoststitle=&quot;Related Posts&quot;;
</script>
<script src='http://helplogger.googlecode.com/svn/trunk/related_posts.js' type='text/javascript'/>
<!--Remove--></b:if>
<!--Related Posts Scripts and Styles End-->

Note:
- if you want to change the size and color of 'Related Posts' title, change the bolded values (17 for the font size and black for the color)
-to change the related post title color, replace the value in red;
-to change the background color on mouseover, replace the color value in blue;

Step 4. Now find (CTRL + F) the below line:

    <div class='post-footer'>

Step 5. Just above it, paste the code below:

<!-- Related Posts Code Start-->
<!--Remove-->
<b:if cond='data:blog.pageType == &quot;item&quot;'>
<div id='related-posts'> <b:loop values='data:post.labels' var='label'> <b:if cond='data:label.isLast != &quot;true&quot;'> </b:if> <b:if cond='data:blog.pageType == &quot;item&quot;'> <script expr:src='&quot;/feeds/posts/default/-/&quot; + data:label.name + &quot;?alt=json-in-script&amp;callback=related_results_labels&amp;max-results=6&quot;' type='text/javascript'/></b:if></b:loop>
<script type='text/javascript'> var maxresults=5; removeRelatedDuplicates(); printRelatedLabels(&quot;<data:post.url/>&quot;); </script> </div> <!--Remove--></b:if> <!-- Related Posts Code End-->

Note: In order to change the number of maximum related posts being displayed for each label, search for the code max-results=5 and change the number "5" to any desired number.

Step 6. Now Save your Template

Enjoy!!!

How To Allow Your Blog To Index On Search Engine

    We will be very happy when our blog's name/address comes on search engines or search result. I know ,how much happy was that,Really amazing :) .
    But most Blog's didn't find's on search results.When we search any topics,most of the results were from Registered domains .
Don't you ever thing why it so ?
 It s due to lack of Search engine Optimization works,(Don't bother about it right now) , ere we do the first step of SEO of blog.

If you getting started with blogger you must allow your blog to show up in search Results.Here we go,


  • Login to Blogger with your email id and Password; And go to your blog.
  • Now,Go to Settings >> basic  on left sidebar of your blogger, 
  Check out "Let search engines find your blog ? " Make this as 'YES' .


  • . And click on 'Save Changes' .
Now onwards, Search engines will index your blog on their search results.Remember it is no a instant process it will take its own time to index in search results.

Nest step of SEO work is nothing but adding your blog into Google Webmaster Tool.

Thursday, 14 February 2013

How To Know Online Users through Google Analytics

Google analytics has introduced beta Real time web-tool which provides you all the details of online visitors of your website/blog.It includes Location he comes,pageviews,keyword that visitor used,top referrals , active pages and more than you need.


 There exist many web tools to find Online users of your blog/website.But i recommend you to use this feature because it gives you more than others and customizable gadgets make you more easy


How To Delete Blog In New Blogger Interface

Deletion of blog was quite simple in New Blogger Interface.Let you know how was deletion of blog in Old Blogger Interface.Simply go to settings and Delete blog.

Let me guide you how do I delete blogger blog in new Blogger interface.


  • Login to blogger with Email ID and Password.Then Choose your blog from the list(If you own two  or more blog in one account).
  • Now go to 'Settings', after Click on 'Other' ion left sidebar.
  • Now Click on 'Delete blog' on Top .
  • Then new warning box will appear,If you need Backup of your blog, you can download from here itself .Then Click on 'Delete blog' Button. 
  • Now your Blog get deleted .
Note: Deleted bog can restore within 90 days before they removed forever .

This week we gave away a freebie set of 3D Social Icons with names, the social icons set was very popular with almost 500 downloads in 3 days ! At the time of writing I am using these Icons here on How To All Tools.I have added a few effects to the icons.The main effect and I have received a lot of comments and Emails on this is Css rotate.With the Css rotate when you place your cursor over each icon they spin 360 degrees, they then spin back 360 when the cursor is removed (Cool eh).I also have a slight opacity hover effect on the icons.So in this post I will show you how to add the icons to your blog, linked to your social profiles and feeds.


Live Demo

Here are the icons is full working order, see what happens when you place your cursor over them ; don't be afraid to click them and follow us.


Icon Icon Icon Icon Follow Me on Pinterest

Howtoalltools.blogspot.com


Add The Social Icons With Css Effects To Your Blog


OK so I have two tutorials, one for Blogger and one for Wordprtess.

Wordpress Tutorial


1) In Your Wordpress Dashboard Click 'Apperance' > 'Widgets' > Add A text Widget to your sidebar and paste the below code.

Widget Code


<style> #social a:hover {background-color: transparent;opacity:0.7;} #social img { -moz-transition: all 0.8s ease-in-out; -webkit-transition: all 0.8s ease-in-out; -o-transition: all 0.8s ease-in-out; -ms-transition: all 0.8s ease-in-out; transition: all 0.8s ease-in-out; } #social img:hover { -moz-transform: rotate(360deg); -webkit-transform: rotate(360deg); -o-transform: rotate(360deg); -ms-transform: rotate(360deg); transform: rotate(360deg); } </style> <center><div id="social"> <!--Start Rss Icon--> <a title="Grab Our Rss Feed" href="YOUR-FEED-URL-HERE" target="_blank"><img border="0" src="https://blogger.googleusercontent.com/img/b/R29vZ2xl/AVvXsEivciN_xTvIRsjjlBZm3ybg7tmbQFVsXbS3Y7r4FmHEFjg0aE15GNuu9gfRo6OCVgSDa243P7rD1-Aal8TyQv3Ks6af20Yqsb_J113bmpeLNH8q-L27n6V3jZzYBjMlqEchXEJ6UDVfYJDh/s1600/RSS-48x48.png" style="margin-right:1px;" alt="Icon"/></a> <!--End Rss Icon--> <!--Start Email Rss Icon--> <a rel="nofollow" title="Get Free Updates Via Email" href="YOUR-EMAIL-RSS-URL-HERE" target="_blank"><img border="0" src="https://blogger.googleusercontent.com/img/b/R29vZ2xl/AVvXsEhoLmcckNFyRzubR9_xhLRJvp0q3C1u7z9dQI-HbD6qIWfrvmhlxcwIJaMQIjWEPH4oqrjhZ70B9ETORt8QUmSVfQCXS5zeuQ1sMJuhnlJkCd6sXiNp_sGtRICRzRC3DEq7updqwW-pf5J1/s1600/RSS-EMAIL-48x48.png" style="margin-right:1px;" alt="Icon"/></a> <!--End Email Rss Icon--> <!--Start Facebook Icon--> <a rel="nofollow" title="Like Our Facebook Page" href="YOUR-FACEBOOK-PAGE-URL-HERE" target="_blank"><img border="0" src="https://blogger.googleusercontent.com/img/b/R29vZ2xl/AVvXsEjFnFX7jSIyUwrZqR3RlMVngjKU8Zj-Ok5dWz6jYFI8jeleL-9Ow1bozW9GkAYRWC2eexmWtRJecC-zIam-BMPxoPivCmQsa0P5WOBK1Tsgf6H-4-XP_XRnr6FSJhamLm5NhR7gBMrvc_9o/s1600/FACEBOOK-48x48.png" style="margin-right:1px;" alt="Icon"/></a> <!--End Facebook Icon--> <!--Start Twitter Icon--> <a rel="nofollow" title="Follow Our Updates On Twitter" href="YOUR-TWITTER-URL-HERE" target="_blank"><img border="0" src="https://blogger.googleusercontent.com/img/b/R29vZ2xl/AVvXsEjSmRsDmxPCcOvz2lso-p3P6RDggvBim5M4BpbupG3wxZnnTeTgzMumTKo7WRqqnadO5BV-zJZcawWdztw_AY1r36NCbVqrciWrJdP5ETWxkkjc-jVeY12Jc5-1JtCcIorQFV6eSdhLn9Ho/s1600/TWITTER-48x48.png" style="margin-right:1px;" alt="Icon"/></a> <!--End Twitter Icon--> <!--Start Google+ Icon--> <a title="Follow Us On Google+" rel="nofollow" href="YOUR-GOOGLE-PLUS-URL-HERE" target="_blank"><img style="margin-right:1px;" src="https://blogger.googleusercontent.com/img/b/R29vZ2xl/AVvXsEjGytR4ZzsPteoleEmLCFJzMfW0AotAuExmVe5kiuo6v4_k39BjPTSspQ5-awhr_gHOejkfICRBKLVwXO2SgOT5yvLoCq7qR1vunyLTFr0Em7tEum5v1Fj7ZHm0eAW9jKYV3ZhlKJinOrpB/s1600/GOOGLE-PLUS-48x48.png"/></a> <!--End Google+ Icon--> <!--Start Pinterest Icon--> <a title="Follow Our Pins" rel="nofollow" href="YOUR-PINTEREST-URL-HERE" target="_blank"><img style="margin-right:1px;" src="https://blogger.googleusercontent.com/img/b/R29vZ2xl/AVvXsEhovEJ6LyZDh2OaC9UsVapwn3cvTY62k-1Qqp81Pu9pFGOe2q2Flw8Uf_WbsaNV2GcC4f5u1qpZGOCcdUQ_FYnU8wOEgy_u4oX-2YBrJIlS1kP9t-jTOf59DIs_Vr_lTIZGT6ZL71me81O9/s1600/PINTEREST-48x48.png" alt="Follow Me on Pinterest" /></a> <!--End Pinterest Icon--> </div><br/> <!--Start Feed Count Button--> <a href="YOUR-FEEDBURNER-URL-HERE" target="_blank"><img alt="Howtoalltools.blogspot.com" src="http://feeds.feedburner.com/~fc/spiceupyourblog?bg=ff9933&fg=000000&anim=1" style="border:0" /></a><!--End Feed Count Button--> </center>

Important - Replace the yellow sections with your social profiles and feed URLs.

Note - If your familiar with Wordpress you can off course add the Css to your theme stylesheet.

Remove some of the icons - I have the code for each icon between tags like this <!--Start Rss Icon-->Code here<!--End Rss Icon-->>, to remove an icon remove the code between the tags.So for pinterest you will remove the code between the Start Pinterest and End Pinterest tags etc...

Blogger Tutorial

1) In the new Blogger dashboard click the drop down menu for your blog > Choose 'Layout' > Click 'Add A Gadget' > Choose 'Html Javascript' > Paste Below Code.
 Widget Code


<style> #social a:hover {background-color: transparent;opacity:0.7;} #social img { -moz-transition: all 0.8s ease-in-out; -webkit-transition: all 0.8s ease-in-out; -o-transition: all 0.8s ease-in-out; -ms-transition: all 0.8s ease-in-out; transition: all 0.8s ease-in-out; } #social img:hover { -moz-transform: rotate(360deg); -webkit-transform: rotate(360deg); -o-transform: rotate(360deg); -ms-transform: rotate(360deg); transform: rotate(360deg); } </style> <center><div id="social"> <!--Start Rss Icon--> <a title="Grab Our Rss Feed" href="YOUR-FEED-URL-HERE" target="_blank"><img border="0" src="https://blogger.googleusercontent.com/img/b/R29vZ2xl/AVvXsEivciN_xTvIRsjjlBZm3ybg7tmbQFVsXbS3Y7r4FmHEFjg0aE15GNuu9gfRo6OCVgSDa243P7rD1-Aal8TyQv3Ks6af20Yqsb_J113bmpeLNH8q-L27n6V3jZzYBjMlqEchXEJ6UDVfYJDh/s1600/RSS-48x48.png" style="margin-right:1px;" alt="Icon"/></a> <!--End Rss Icon--> <!--Start Email Rss Icon--> <a rel="nofollow" title="Get Free Updates Via Email" href="YOUR-EMAIL-RSS-URL-HERE" target="_blank"><img border="0" src="https://blogger.googleusercontent.com/img/b/R29vZ2xl/AVvXsEhoLmcckNFyRzubR9_xhLRJvp0q3C1u7z9dQI-HbD6qIWfrvmhlxcwIJaMQIjWEPH4oqrjhZ70B9ETORt8QUmSVfQCXS5zeuQ1sMJuhnlJkCd6sXiNp_sGtRICRzRC3DEq7updqwW-pf5J1/s1600/RSS-EMAIL-48x48.png" style="margin-right:1px;" alt="Icon"/></a> <!--End Email Rss Icon--> <!--Start Facebook Icon--> <a rel="nofollow" title="Like Our Facebook Page" href="YOUR-FACEBOOK-PAGE-URL-HERE" target="_blank"><img border="0" src="https://blogger.googleusercontent.com/img/b/R29vZ2xl/AVvXsEjFnFX7jSIyUwrZqR3RlMVngjKU8Zj-Ok5dWz6jYFI8jeleL-9Ow1bozW9GkAYRWC2eexmWtRJecC-zIam-BMPxoPivCmQsa0P5WOBK1Tsgf6H-4-XP_XRnr6FSJhamLm5NhR7gBMrvc_9o/s1600/FACEBOOK-48x48.png" style="margin-right:1px;" alt="Icon"/></a> <!--End Facebook Icon--> <!--Start Twitter Icon--> <a rel="nofollow" title="Follow Our Updates On Twitter" href="YOUR-TWITTER-URL-HERE" target="_blank"><img border="0" src="https://blogger.googleusercontent.com/img/b/R29vZ2xl/AVvXsEjSmRsDmxPCcOvz2lso-p3P6RDggvBim5M4BpbupG3wxZnnTeTgzMumTKo7WRqqnadO5BV-zJZcawWdztw_AY1r36NCbVqrciWrJdP5ETWxkkjc-jVeY12Jc5-1JtCcIorQFV6eSdhLn9Ho/s1600/TWITTER-48x48.png" style="margin-right:1px;" alt="Icon"/></a> <!--End Twitter Icon--> <!--Start Google+ Icon--> <a title="Follow Us On Google+" rel="nofollow" href="YOUR-GOOGLE-PLUS-URL-HERE" target="_blank"><img style="margin-right:1px;" src="https://blogger.googleusercontent.com/img/b/R29vZ2xl/AVvXsEjGytR4ZzsPteoleEmLCFJzMfW0AotAuExmVe5kiuo6v4_k39BjPTSspQ5-awhr_gHOejkfICRBKLVwXO2SgOT5yvLoCq7qR1vunyLTFr0Em7tEum5v1Fj7ZHm0eAW9jKYV3ZhlKJinOrpB/s1600/GOOGLE-PLUS-48x48.png"/></a> <!--End Google+ Icon--> <!--Start Pinterest Icon--> <a title="Follow Our Pins" rel="nofollow" href="YOUR-PINTEREST-URL-HERE" target="_blank"><img style="margin-right:1px;" src="https://blogger.googleusercontent.com/img/b/R29vZ2xl/AVvXsEhovEJ6LyZDh2OaC9UsVapwn3cvTY62k-1Qqp81Pu9pFGOe2q2Flw8Uf_WbsaNV2GcC4f5u1qpZGOCcdUQ_FYnU8wOEgy_u4oX-2YBrJIlS1kP9t-jTOf59DIs_Vr_lTIZGT6ZL71me81O9/s1600/PINTEREST-48x48.png" alt="Follow Me on Pinterest" /></a> <!--End Pinterest Icon--> </div><br/> <!--Start Feed Count Button--> <a href="YOUR-FEEDBURNER-URL-HERE" target="_blank"><img alt="Howtoalltools.blogspot.com" src="http://feeds.feedburner.com/~fc/spiceupyourblog?bg=ff9933&fg=000000&anim=1" style="border:0" /></a><!--End Feed Count Button--> </center>

Important - Replace the yellow sections with your social profiles and feed URLs.

Remove some of the icons - I have the code for each icon between tags like this <!--Start Rss Icon-->Code here<!--End Rss Icon-->>, to remove an icon remove the code between the tags.So for pinterest you will remove the code between the Start Pinterest and End Pinterest tags etc...

That's it you have a very cool subscribe section on your blog.

Drop Your Comments And Questions Below.

Tuesday, 12 February 2013

How To All Tools
                  Hex Color Code Generator  

Generate Your Own Custom Hex Colors

1. Drag the black bar on the "Hue" selector to generate the desired base color. 
2. Next double click inside the Brightness/Saturation grid to activate the cursor.  Drag it until the desired brightness is achieved. 
The "Swatch" bar shows you the final color result.
3. The hex color code is generated at the bottom of the grid in the "Hex" box.  Simply copy and paste the code into your page.  


Popular Hex Colors


#FFFFFF
#000000
#C0C0C0
#808080
#FF0000
#F0A804
#FFFF00
#008000
#0000FF
#800080

© 2013 How To All Tools. All Rights Reserved.
Content On this page can not be republished.
Your facebook profile is important for you to know, because the are some cases whereby you want to create a application and you will be required to provide it
 such as adding new facebook comment box to your blog/site, and make sure you use a correct id for you to receive notification directly to your facebook account.


Easily find your Facebook numeric personal ID for fb:admins social plugins and more!


How To Get Facebook Profile Id

  • Open your Browser
  • Type this Addreess http://findmyfacebookid.com/
  • Enter your personal Facebook profile URL: or Fan Page Url
  • Then Click "Lookup Numeric ID"
  • on the next page you will see digits.

Now done you did this this is your Facebook Profile ID.
dding subscription box below your each post is another best way of increasing your blog subscribers. This widget comprises of a subscription box, RSS link, twitter link, facebook link, and google + link. It will appear at the bottom of your post and this is one of the best way to get your readers attention.


How To Add The Subscription Box
  • Go to your blogger dashboard
  • Click on "Design" > "Edit HTML" > Back up your template
  • Mark/Tick "Expand Widget Templates"
  • Use crtl F to find the code below
<div class='post-footer'>

Now paste the code below immediately Before the code above

<b:if cond='data:blog.pageType == &quot;item&quot;'>
<style>
form.feedburner{
margin:20px 0 0;
display:block;
clear:both;
}
.RBstyle{
background:url(https://blogger.googleusercontent.com/img/b/R29vZ2xl/AVvXsEhSAwCGlcDmx0PnbvurQPKbi7-igoTkSBZyj9IL9_8ZQnpqhmtI_gZfomSezgP4YEYn5Ih8wZ_fnuNAI5l-4pq_0T4OpvM_SnT1kTvd-DhRsJ48ZZYG_JQL-Tta0ZcKn_ortpBvsjZ0afW-/s400/email_icon.png) no-repeat scroll 4px center transparent;
padding:7px 15px 7px 35px;
color:#666;
font-weight:bold;
text-decoration:none;
border:1px solid #D3D3D3;
-moz-border-radius: 4px;
-webkit-border-radius: 4px;
border-radius: 4px;
-moz-box-shadow: 1px 1px 2px #CCC inset;
-webkit-box-shadow: 1px 1px 2px #CCC inset;
box-shadow: 1px 1px 2px #CCC inset;
}
.RBsubmit{
color:#666;
font-weight:bold;
text-decoration:none;
padding:6px 15px;
border:1px solid #D3D3D3;
cursor: pointer;
-moz-border-radius: 4px;
-webkit-border-radius: 4px;
-goog-ms-border-radius: 4px;
border-radius: 4px;
background: #fbfbfb;
background: -moz-linear-gradient(top, #fbfbfb 0%, #f4f4f4 100%);
background: -webkit-gradient(linear, left top, left bottom, color-stop(0%,#fbfbfb), color-stop(100%,#f4f4f4));
background: -webkit-linear-gradient(top, #fbfbfb 0%,#f4f4f4 100%);
background: -o-linear-gradient(top, #fbfbfb 0%,#f4f4f4 100%);
background: -ms-linear-gradient(top, #fbfbfb 0%,#f4f4f4 100%);
filter: progid:DXImageTransform.Microsoft.gradient( startColorstr=&#39;#FBFBFB&#39;, endColorstr=&#39;#F4F4F4&#39;,GradientType=0 );
background: linear-gradient(top, #fbfbfb 0%,#f4f4f4 100%);
}

#emailwidget-outer {
-moz-border-radius: 10px 10px 10px 10px;
-webkit-border-radius: 10px 10px 10px 10px;
-goog-ms-border-radius: 10px 10px 10px 10px;
border-radius: 10px;
background: none repeat scroll 0 0 transparent;
border: 1px solid #D3D3D3;
padding: 8px;
-moz-transition: all 0.3s ease-out;
-o-transition: all 0.3s ease-out;
-webkit-transition: all 0.3s ease-out;
-ms-transition: all 0.3s ease-out;
transition: all 0.3s ease-out;
width:480px;
}
#emailwidget-outer:hover{
background: none repeat scroll 0 0 #FFF;
-moz-box-shadow: 1px 1px 2px #CCC inset;
-webkit-box-shadow: 1px 1px 2px #CCC inset;
box-shadow: 1px 1px 2px #CCC inset;
}
#emailwidget-outer td{
padding:3px 0;
}
</style>

<center>
<div id='emailwidget-outer'>
<div id='emailwidget'>
<table style='border:none; margin: 0px 0px 0px 0px; padding: 0px 0px 0px 0px;' width='100%'>
<tbody>

<tr style='border:none; margin: 0px 0px 0px 0px; padding: 0px 0px 0px 0px;'>

<td align='left' style='border:none; margin: 0px 0px 0px 0px; padding: 0px 0px 0px 0px;'> <p style='color:#666; font-weight: bold; font-size: 22px; margin:0px 0px 5px 0px; '>Get free daily email updates!</p>
<form action='http://feedburner.google.com/fb/a/mailverify' class='feedburner' method='post' onsubmit='window.open(&apos;http://feedburner.google.com/fb/a/mailverify?uri=HowToAllToolsTopTutriolsToolsAndTips&apos;, &apos;popupwindow&apos;, &apos;scrollbars=yes,width=550,height=520&apos;);return true' style='margin: 0pt;' target='popupwindow'>
<input name='uri' type='hidden' value='Realcombiz'/>
<input name='loc' type='hidden' value='en_US'/>
<input class='RBstyle' name='email' onblur='if (this.value == &quot;&quot;) {this.value = &quot;Enter your email…&quot;;}' onfocus='if (this.value == &quot;Enter your email…&quot;) {this.value = &quot;&quot;}' type='text' value='Enter your email…'/>

<input alt='' class='RBsubmit' title='' type='submit' value='Submit'/>
</form>
</td>

<td style='border:none; margin: 0px 0px 0px 0px; padding: 0px 0px 0px 0px;'><p style='color:#666; font-weight: bold; font-size: 14px; margin:0px 0px 5px 0px; '>Follow us!</p>
<a href='http://feedburner.google.com/fb/a/mailverify?uri=HowToAllToolsTopTutriolsToolsAndTips' rel='nofollow' target='_blank' title='Suscribe to RSS Feed'><img src='https://blogger.googleusercontent.com/img/b/R29vZ2xl/AVvXsEj4NMSYQEFR39cFQESv2HidKNdl8FeXwqbg61mgQPe115LW7BK9oevoAXPh3JFPHEZDMuumddDjDyY6qb2bD9sT9RWW6p0x1Xi8HzPSFBCC37ugOjFNuBtNEcUOxGptbhiEkD76dZ7enoE/s1600/rss-30×43.png'/></a>

<a href='http://twitter.com/Howtoalltools' rel='nofollow' target='_blank' title='Follow us on Twitter'><img src='https://blogger.googleusercontent.com/img/b/R29vZ2xl/AVvXsEhuLfoEAKypzgM3sIj68w5viMskfGwPaT3nZrQKhWV4AgSH4IrwRqd4gX6ma0XwktefVUUlv70nMEOur1wa5x9u9I8DJs_SMfCZ1aqaQ6czpBy7FVCzRRVyqWdjlwzu7rni-JBgxRz768Y/s1600/twitter-30×43.png'/></a>

<a href='http://www.facebook.com/Howtoalltools' rel='nofollow' target='_blank' title='Follow us on Facebook'><img src='https://blogger.googleusercontent.com/img/b/R29vZ2xl/AVvXsEgWj6fFmLMBApYyMKInHqycT51NLlxH4EY3SmjbZTdN3wZ5NXYLUR_lOdB6HbIcP8i6oUAxcdqs6Jv2J9vmgL0ZBD8mREsgIyb0JUZQd-mBvLfSj46TcYIUET1oBJfQdEo4M7eA9cLB_0U/s1600/facebook-30×43.png'/></a>

<a href='https://plus.google.com/u/0/114198260034907980206/' rel='nofollow' target='_blank' title='Follow us on Google+'><img src='https://blogger.googleusercontent.com/img/b/R29vZ2xl/AVvXsEh-ksBFUQZZaGposNVxtJYsoOFxsUQVwvDbmgy1TN-RdMO-be9694z2o1oswAIP76fjtRV-NeoEYL5NsoC1SM5JRgurhZ4DsDpTkcXJa-IaFwtkMeKJGGqZoJkRFdnssjSM2R8BgxvV9mM/s1600/googleplus-30×43.png'/></a>

</td>
</tr>
</tbody></table>
<div align='right'><span style='font-style: italic; font-size: 8px; color: solid #ffffff;'><a href='http://howtoalltools.blogspot.com/2013/02/add-stylish-subscription-box-with-share.html' style='text-decoration: none;' target='_blank'><font color='#ffffff' decoration='none'>[Get this widget]</font></a></span></div>
</div></div>
</center>
</b:if>
  • Replace http://feedburner.google.com/fb/a/mailverify?uri=HowToAllToolsTopTutriolsToolsAndTips with your your feedburner url
  • Replace http://twitter.com/Howtoalltools with your twitter profile url
  • Replace http://www.facebook.com/Howtoalltools with your facebook page url
  • Replace https://plus.google.com/u/0/114198260034907980206/ with your google + profile url
  • Click "SAVE TEMPLATE"
Hope you love this eye-catching subscription box? share your view about this. Don't forget to subscribe and share this post.
After a little break, i think i should come back with something unique, so i will will be sharing with how you can add a five different social media widget to your blog/site.
This widget comprises of facebook like box, twitter follower box, Google plus, Youtube and RSS feed subscribe box, and this widget will slide out smoothly when you place your cursor on any of the widget, due to the jQuery effect that is included.
Follow the simple procedure below on how you can use this five stylish widgets to spice up your blog/site.


How To Add The Widget To Your Blog

STEP 1

  • Login to your blogger dashboard
  • Click on "Design" > "Edit HTML" > back up your template
  • Use ctrl F to find </head> and paste the following code above/before </head>
<script src='http://ajax.googleapis.com/ajax/libs/jquery/1.4.2/jquery.min.js' type='text/javascript'/>
<script type='text/javascript'>
jQuery(document).ready (
function(){jQuery("#facebook_right").hover(function(){ jQuery(this).stop(true,false).animate({right: 0}, 500); },
function(){ jQuery("#facebook_right").stop(true,false).animate({right: -249}, 500); });
jQuery("#twitter_right").hover(function(){ jQuery(this).stop(true,false).animate({right: 0}, 500); },
function(){ jQuery("#twitter_right").stop(true,false).animate({right: -264}, 500); });
jQuery("#google_plus_right").hover(function(){ jQuery(this).stop(true,false).animate({right: 0}, 500); },
function(){ jQuery("#google_plus_right").stop(true,false).animate({right: -323}, 500); });
jQuery("#youtube_right").hover(function(){ jQuery(this).stop(true,false).animate({right: 0}, 500); },
function(){ jQuery("#youtube_right").stop(true,false).animate({right: -303}, 500); });
jQuery("#feedburner_right").hover(function(){ jQuery(this).stop(true,false).animate({right: 0}, 500); },
function(){ jQuery("#feedburner_right").stop(true,false).animate({right: -303}, 500); });
});
</script>
  • Click "SAVE TEMPLATE"
STEP 2

  • Go to "Design" > "Page Elements" > "Add a Gadget"
  • Choose "HTML/JavaScript" from the list of the gadget that appear in the pop-up window
  • Copy and paste the code below in the content box leaving the title box blank.
<style>
img, a { border: 0; }
#on {visibility:visible;}
#off {visibility:hidden;}
#facebook_div {width:245px;height: 260px;overflow: hidden;}
#twitter_div {width:260px;height: 238px;overflow: hidden;}
#google_plus_div {width:320px;height: 143px;overflow: hidden;}
#knfeedburner_div {width:300px;height: 97px;overflow: hidden;}
#youtube_div {width:300px;height: 97px;overflow: hidden;}
#facebook_right {z-index: 10005;border:2px solid #3c95d9;background-color: #fff;width:245px;height: 260px;position: fixed;right: -249px;}
#facebook_right img {position: absolute;top: -2px;left: -35px;}
#facebook_right iframe {border:0px solid #3c95d9;overflow: hidden;position: static;height: 360px;left:-2px;top:-3px;}
#twitter_right {z-index: 10004;border:2px solid #6CC5FF;background-color: #6CC5FF;width:260px;height: 238px;position: fixed;right: -264px;}
#twitter_right_img {position: absolute;top: -2px;left: -35px;border: 0;}
#google_plus_right {z-index: 10003;background-color: #006ec9;border:2px solid #006ec9;border-top:2px solid #0056a0;border-bottom: 2px solid #0056a0;border-right:2px solid #0056a0;border-left: hidden;width:320px;height: 143px;position: fixed;right: -323px;}
#google_plus_right_img {position: absolute;top: -2px;left: -33px;border: 0;}
#youtube_right {z-index: 10002;background-color: #fefefe;border:2px solid #ff0000;border-top:2px solid #5b5b5b;border-bottom: 2px solid #5b5b5b;border-right:2px solid #5b5b5b;border-left: hidden;width:301px;height: 100px;position: fixed;right: -303px;}
#youtube_right_img {position: absolute;top: -2px;left: -33px;border: 0;}
#feedburner_right {z-index: 10001;background-color: #fefefe;border:2px solid #5b5b5b;border-top:2px solid #5b5b5b;border-bottom: 2px solid #5b5b5b;border-right:2px solid #5b5b5b;border-left: hidden;width:300px;height: 97px;position: fixed;right: -303px;}
#feedburner_right_img {position: absolute;top: -2px;left: -33px;border: 0;}
</style>
<div id="on">
<div id="facebook_right" style="top: 8%;">
<div id="facebook_div">
<img src="https://blogger.googleusercontent.com/img/b/R29vZ2xl/AVvXsEgoa4fbDtfFvhdKisAmPvfz-zMAj7JT5hRwIyYJCU72lxLnrmDRZaExFUAy1fnofz77GtVAIX7o_H9yA98aMbNZx_mesW8OwAF1nyGTvktO1XL7B5xbF0tFXNgu1zSdNZm51X3Aj7TiGA/s1600/Facebook.png" />
<iframe src="http://www.facebook.com/plugins/likebox.php?href=http%3A%2F%2Ffacebook.com%2FHowtoalltools&amp;locale=en_GB&amp;width=245&amp;connections=9&amp;stream=&amp;header=false&amp;show_faces=0&amp;height=260" scrolling="no"></iframe>
</div>
</div>
</div>
</div>
<div id="on">
<div id="twitter_right" style="top: 25%;">
<div id="twitter_div">
<img id="twitter_right_img" src="https://blogger.googleusercontent.com/img/b/R29vZ2xl/AVvXsEjhxCFRJ8r9HYD5DluBJDamqcav3-G7OFLD_KAIZeofWBYDtC-oX0xuV0d3Q9-SCwgo9cBnboCa6T0Fl__CSTfghXTlfnw_piEXFF9iAuDCjFtpRifr8Lwf-E1HGK5Ut4OCyt4fYpKweg/s1600/Twitter.png" />
<script type="text/javascript" src="http://script-ot.googlecode.com/svn/twitterbox.js"></script>
<div id="twitterfanbox"></div>
<script type="text/javascript">fanbox_init("Howtoalltools");</script>
</div>
</div>
</div>
</div>
<div id="on">
 <div id="google_plus_right" style="top: 42%;">
  <div id="google_plus_div">
   <img id="google_plus_right_img" src="https://blogger.googleusercontent.com/img/b/R29vZ2xl/AVvXsEiBCnJ6cuMs7MJXlNFa_uCVumUW-09PgFqZmTvaVmnt-zFkIB1b-BE0BVQTnIJ7FrJngju_L2aDsAztOi3oVm3OVqCJN0EkwyN-yBv8SPP5iAxP95goRIbfh_7SQ1Wu38FmkIk0yePyeg/s1600/Google+Plus.png"/>
   <div style="float:left;margin:1px 0px 0px 2px;">
    <g:plusone size="tall" expr:href="data:post.url"></g:plusone>
</div>
</div>
</div>
</div>
<div id="on">
<div id="youtube_right" style="top: 59%;">
<div id="youtube_div">
<img id="youtube_right_img" src="https://blogger.googleusercontent.com/img/b/R29vZ2xl/AVvXsEjo2jQ7VcYfi14E0F4-i4PYchzGco-bVuUKndMJuwbA_xcxULJTGm856wJDClRry1iRRTWQNuhOpjcYyM2rVeafY7eJxIdA_Usue5JACMJ9V6M61DXUHAXa7uAIPHJN0XyhxhiT_2TtIA/s1600/YouTube.png" />
<div style="float:left;margin:1px 0px 0px 2px;">
<iframe src=http://www.youtube.com/subscribe_widget?p=howtoalltools style="height: 105px; width: 300px; border: 0;" scrolling="no" frameborder="0"></iframe>
</div>
</div>
</div>
</div>
<div id="on">
<div id="feedburner_right" style=" top: 76%;">
<div id="knfeedburner_div">
<center><br/>
<h4 style="color:#F66303;">Subscribe And Get Free E-Mail Updates:</h4>
<form action="http://feedburner.google.com/fb/a/mailverify" method="post" target="popupwindow" onsubmit="window.open('http://feedburner.google.com/fb/a/mailverify?uri=HowToAllToolsTopTutriolsToolsAndTips', 'popupwindow', 'scrollbars=yes,width=550,height=520');return true"><input gtbfieldid="10" class="enteryouremail" name="email" value="Enter Your E-Mail Here..." onblur="if (this.value == &#39;&#39;) {this.value = &#39;Enter Your E-Mail Here...&#39;;}" onfocus="if (this.value == &#39;Enter Your E-Mail Here...&#39;) {this.value = &#39;&#39;;}" type="text" /><input value="HowToAllToolsTopTutriolsToolsAndTips" name="uri" type="hidden" /><input value="Submit" class="submitbutton" type="submit" /></form>
</center>
<img id="feedburner_right_img" src="https://blogger.googleusercontent.com/img/b/R29vZ2xl/AVvXsEir705gPYdIXYUwQ8BbgLoP2ow6dxQC9dOF_7Ubwfld_HUVq-Qj_kqrxNpmCpawZxGm9L_Fmrv2whWlHrqwo8smRsfIqU6KzgNBl5YV3HVOOVHgou5LJs_Ho57MOvFVNSWDtzz9W8b3HA/s1600/Subscribe.png" />
</div>
</div>
</div>
  • Replace howtoalltools with your facebook fan page username
  • Replace howtoalltools with your twitter username
  • Replace howtoalltools with your youtube username
  • Replace http://feedburner.google.com/fb/a/mailverify?uri=HowToAllToolsTopTutriolsToolsAndTips with your feedburner url
  • Replace HowToAllToolsTopTutriolsToolsAndTips with your feedburner username
  • Click "Save" when you are through with your editing

Thursday, 18 October 2012

Add The V3 Complete Sexy Bookmarks Gadget To Your Blog


Step 1. In Your Blogger Dashboard Click Design > Edit Html > Tick The Expand Widget Templates Box

Design Edit Html Widget Templates

Step 2. Find the following piece of code in your blogs Html
</head>

Step 3. Copy and Paste the following code directly Above / Before </head>

-If you previously added jQuery to your blog you can remove the line in yellow.

<script src='http://ajax.googleapis.com/ajax/libs/jquery/1.5.0/jquery.min.js'
type='text/javascript' />
<link href='http://bloggerblogwidgets.googlecode.com/svn/trunk/auto-hide-social-bookmarking-way2blogging.css'
rel='stylesheet' type='text/css' />
<script type="text/javascript">
jQuery(document).ready(function() {
jQuery('.sexy-bookmarks a.external').attr("target", "_blank");
var sexyBaseHeight = jQuery('.sexy-bookmarks').height();
var sexyFullHeight = jQuery('.sexy-bookmarks ul.socials').height();
if (sexyFullHeight > sexyBaseHeight) {
jQuery('.sexy-bookmarks-expand').hover(

function() {
jQuery(this).animate({
height: sexyFullHeight + 15 + 'px'
}, {
duration: 800,
queue: false
});
}, function() {
jQuery(this).animate({
height: sexyBaseHeight + 'px'
}, {
duration: 800,
queue: false
});
});
}
if (jQuery('.sexy-bookmarks-center')) {
var sexyFullWidth = jQuery('.sexy-bookmarks').width();
var sexyBookmarkWidth = jQuery('.sexy-bookmarks:first ul.socials li').width();
var sexyBookmarkCount = jQuery('.sexy-bookmarks:first ul.socials li').length;
var numPerRow = Math.floor(sexyFullWidth / sexyBookmarkWidth);
var sexyRowWidth = Math.min(numPerRow, sexyBookmarkCount) * sexyBookmarkWidth;
var sexyLeftMargin = (sexyFullWidth - sexyRowWidth) / 2;
jQuery('.sexy-bookmarks-center').css('margin-left', sexyLeftMargin + 'px');
}
});
</script>


Step 4. Find the following piece of code in your blogs Html
<div class='post-footer'>

- If you cant find this use <data:post.body/>
instead.

Step 5. Copy and Paste the following code Directly Below / Under <div class='post-footer'>

<!--start bookmarks sexy-->
<b:if cond='data:blog.pageType == &quot;item&quot;'>
<div id='post-width-w2b' style='width:550px;'>
<div class='sexy-bookmarks-bg-sexy sexy-bookmarks sexy-bookmarks-expand sexy-bookmarks-center '>
<ul class='socials'>
<li class='sexy-twitter'>
<a class='external' expr:href='&quot;http://twitter.com/home?status=&quot; + data:post.title + &quot; -- &quot; + data:post.url ' rel='nofollow' title='Tweet This!'/>
</li>
<li class='sexy-facebook'>
<a class='external' expr:href='&quot;http://www.facebook.com/share.php?v=4&amp;src=bm&amp;u=&quot; + data:post.url + &quot;&amp;t=&quot; + data:post.title ' onclick='window.open(this.href,&apos;sharer&apos;,&apos;toolbar=0,status=0,width=626,height=436&apos;); return false;' rel='nofollow' title='Share this on Facebook'/>
</li>
<li class='sexy-linkedin'>
<a class='external' expr:href='&quot;http://www.linkedin.com/shareArticle?mini=true&amp;url=&quot; + data:post.url + &quot;&amp;title=&quot; + data:post.title + &quot;&amp;summary=&amp;source=&quot;' rel='nofollow' title='Share this on LinkedIn'/>
</li>
<li class='sexy-stumbleupon'>
<a class='external' expr:href='&quot;http://www.stumbleupon.com/submit?url=&quot; + data:post.url + &quot;&amp;title=&quot; + data:post.title ' rel='nofollow' title='Stumble upon something good? Share it on StumbleUpon'/>
</li>
<li class='sexy-delicious'>
<a class='external' expr:href='&quot;http://delicious.com/post?url=&quot; + data:post.url + &quot;&amp;title=&quot; + data:post.title ' rel='nofollow' title='Share this on del.icio.us'/>
</li>
<li class='sexy-digg'>
<a class='external' expr:href='&quot;http://digg.com/submit?phase=2&amp;url=&quot; + data:post.url + &quot;&amp;title=&quot; + data:post.title ' rel='nofollow' title='Digg this!'/>
</li>
<li class='sexy-googlebuzz'>
<a class='external' expr:href='&quot;http://www.google.com/buzz/post?url=&quot; + data:post.url + &quot;&amp;imageurl=&quot;' rel='nofollow' title='Post on Google Buzz'/>
</li>
<li class='sexy-blogger'>
<a class='external' expr:href='&quot;http://www.blogger.com/blog_this.pyra?t&amp;u=&quot; + data:post.url + &quot;&amp;n=&quot; + data:post.title + &quot;&amp;pli=1&quot;' rel='nofollow' title='Blog this on Blogger'/>
</li>
<li class='sexy-yahoomail'>
<a class='external' expr:href='&quot;http://compose.mail.yahoo.com/?Subject= &quot; + data:post.title + &quot;&amp;body=Link:&quot;+ data:post.url' rel='nofollow' title='Email this via Yahoo! Mail'/>
</li>
<li class='sexy-gmail'>
<a class='external' expr:href='&quot;https://mail.google.com/mail/?ui=2&amp;view=cm&amp;fs=1&amp;tf=1&amp;su=&quot; + data:post.title + &quot;&amp;body=Link:&quot; + data:post.url' rel='nofollow' title='Email this via Gmail'/>
</li>
<li class='sexy-googlebookmarks'>
<a class='external' expr:href='&quot;http://www.google.com/bookmarks/mark?op=add&amp;bkmk=&quot; + data:post.url + &quot;&amp;title=&quot; + data:post.title ' rel='nofollow' title='Add this to Google Bookmarks'/>
</li>
<li class='sexy-googlereader'>
<a class='external' expr:href='&quot;http://www.google.com/reader/link?url=&quot; + data:post.url + &quot;&amp;title=&quot; + data:post.title + &quot;&amp;srcUrl=&quot; + data:post.url + &quot;&amp;srcTitle=&quot; + data:post.title + &quot;&amp;snippet=&quot;' rel='nofollow' title='Add this to Google Reader'/>
</li>
<li class='sexy-comfeed'>
<a class='external' expr:href='data:blog.homepageUrl + &quot;feeds/&quot; + data:post.id + &quot;/comments/default?alt=rss&quot;' rel='nofollow' title='Subscribe to the comments for this post?'/>
</li>
<li class='sexy-orkut'>
<a class='external' expr:href='&quot;http://promote.orkut.com/preview?nt=orkut.com&amp;tt=&quot; + data:post.title + &quot;&amp;du=&quot; + data:post.url + &quot;&amp;cn=&quot;' rel='nofollow' title='Promote this on Orkut'/>
</li>
<li class='sexy-designbump'>
<a class='external' expr:href='&quot;http://designbump.com/submit?url=&quot; + data:post.url + &quot;&amp;title=&quot; + data:post.title + &quot;&amp;body=&quot;' rel='nofollow' title='Bump this on DesignBump'/>
</li>
<li class='sexy-reddit'>
<a class='external' expr:href='&quot;http://reddit.com/submit?url=&quot; + data:post.url + &quot;&amp;title=&quot; + data:post.title ' rel='nofollow' title='Share this on Reddit'/>
</li>
<li class='sexy-designfloat'>
<a class='external' expr:href='&quot;http://www.designfloat.com/submit.php?url=&quot; + data:post.url + &quot;&amp;title=&quot; + data:post.title ' rel='nofollow' title='Submit this to DesignFloat'/>
</li>
<li class='sexy-friendfeed'>
<a class='external' expr:href='&quot;http://www.friendfeed.com/share?title=&quot; + data:post.title + &quot;&amp;link=&quot; + data:post.url ' rel='nofollow' title='Share this on FriendFeed'/>
</li>
<li class='sexy-dzone'>
<a class='external' expr:href='&quot;http://www.dzone.com/links/add.html?url=&quot; + data:post.url + &quot;&amp;title=&quot; + data:post.title + &quot;&amp;description=&quot;' rel='nofollow' title='Add this to DZone'/>
</li>
<li class='sexy-webblend'>
<a class='external' expr:href='&quot;http://thewebblend.com/submit?url=&quot; + data:post.url + &quot;&amp;title=&quot; + data:post.title + &quot;&amp;body=&quot;' rel='nofollow' title='Blend this!'/>
</li>
<li class='sexy-propeller'>
<a class='external' expr:href='&quot;http://www.propeller.com/submit/?url=&quot; + data:post.url ' rel='nofollow' title='Submit this story to Propeller'/>
</li>
<li class='sexy-tumblr'>
<a class='external' expr:href='&quot;http://www.tumblr.com/share?v=3&amp;u=&quot; + data:post.url + &quot;&amp;t=&quot; + data:post.title ' rel='nofollow' title='Share this on Tumblr'/>
</li>
<li class='sexy-squidoo'>
<a class='external' expr:href='&quot;http://www.squidoo.com/lensmaster/bookmark?&quot; + data:post.url ' rel='nofollow' title='Add to a lense on Squidoo'/>
</li>
<li class='sexy-posterous'>
<a class='external' expr:href='&quot;http://posterous.com/share?linkto=&quot; + data:post.url + &quot;&amp;title=&quot; + data:post.title + &quot;&amp;selection=&quot;' rel='nofollow' title='Post this to Posterous'/>
</li>
<li class='sexy-technorati'>
<a class='external' expr:href='&quot;http://technorati.com/faves?add=&quot; + data:post.url ' rel='nofollow' title='Share this on Technorati'/>
</li>
<li class='sexy-hotmail'>
<a class='external' expr:href='&quot;http://mail.live.com/?rru=compose?subject=&quot; + data:post.title + &quot;&amp;body=Link: &quot; + data:post.url ' rel='nofollow' title='Email this via Hotmail'/>
</li>
<li class='sexy-bebo'>
<a class='external' expr:href='&quot;http://www.bebo.com/c/share?Url=&quot; + data:post.url + &quot;&amp;Title=&quot; + data:post.title ' rel='nofollow' title='Share this on Bebo'/>
</li>
<li class='sexy-blinklist'>
<a class='external' expr:href='&quot;http://www.blinklist.com/index.php?Action=Blink/addblink.php&amp;Url=&quot; + data:post.url + &quot;&amp;Title=&quot; + data:post.title ' rel='nofollow' title='Share this on Blinklist'/>
</li>
<li class='sexy-blogengage'>
<a class='external' expr:href='&quot;http://www.blogengage.com/submit.php?url=&quot; + data:post.url ' rel='nofollow' title='Engage with this article!'/>
</li>
<li class='sexy-blogmarks'>
<a class='external' expr:href='&quot;http://blogmarks.net/my/new.php?mini=1&amp;simple=1&amp;url=&quot; + data:post.url + &quot;&amp;title=&quot; + data:post.title ' rel='nofollow' title='Mark this on BlogMarks'/>
</li>
<li class='sexy-boxnet'>
<a class='external' expr:href='&quot;https://www.box.net/api/1.0/import?url=&quot; + data:post.url + &quot;&amp;name=&quot; + data:post.title + &quot;&amp;description=&amp;import_as=link&quot;' rel='nofollow' title='Add this link to Box.net'/>
</li>
<li class='sexy-current'>
<a class='external' expr:href='&quot;http://current.com/clipper.htm?url=&quot; + data:post.url + &quot;&amp;title=&quot; + data:post.title ' rel='nofollow' title='Post this to Current'/>
</li>
<li class='sexy-diigo'>
<a class='external' expr:href='&quot;http://www.diigo.com/post?url=&quot; + data:post.url + &quot;&amp;title=&quot; + data:post.title + &quot;&amp;desc=&quot;' rel='nofollow' title='Post this on Diigo'/>
</li>
<li class='sexy-ekudos'>
<a class='external' expr:href='&quot;http://www.ekudos.nl/artikel/nieuw?url=&quot; + data:post.url + &quot;&amp;title=&quot; + data:post.title + &quot;&amp;desc=&quot;' rel='nofollow' title='Submit this to eKudos'/>
</li>
<li class='sexy-evernote'>
<a class='external' expr:href='&quot;http://www.evernote.com/clip.action?url=&quot; + data:post.url + &quot;&amp;title=&quot; + data:post.title ' rel='nofollow' title='Clip this to Evernote'/>
</li>
<li class='sexy-hackernews'>
<a class='external' expr:href='&quot;http://news.ycombinator.com/submitlink?u=&quot; + data:post.url + &quot;&amp;t=&quot; + data:post.title ' rel='nofollow' title='Submit this to Hacker News'/>
</li>
<li class='sexy-hyves'>
<a class='external' expr:href='&quot;http://www.hyves.nl/profilemanage/add/tips/?name=&quot; + data:post.title + &quot;&amp;text=Text about this site+-+&quot; + data:post.url + &quot;&amp;rating=5&quot;' rel='nofollow' title='Share this on Hyves'/>
</li>
<li class='sexy-identica'>
<a class='external' expr:href='&quot;http://identi.ca//index.php?action=newnotice&amp;status_textarea=Reading:&quot; + data:post.title + &quot;+-+from+&quot; + data:post.url ' rel='nofollow' title='Post this to Identica'/>
</li>
<li class='sexy-jumptags'>
<a class='external' expr:href='&quot;http://www.jumptags.com/add/?url=&quot; + data:post.url + &quot;&amp;title=&quot; + data:post.title ' rel='nofollow' title='Submit this link to JumpTags'/>
</li>
<li class='sexy-mail'>
<a class='external' expr:href='&quot;mailto:?subject=%22&quot; + data:post.title + &quot;%22&amp;body=Link: &quot; + data:post.url + &quot; (sent via Way2blogging) &quot;' rel='nofollow' title='Email this to a friend?'/>
</li>
<li class='sexy-meneame'>
<a class='external' expr:href='&quot;http://meneame.net/submit.php?url=&quot; + data:post.url ' rel='nofollow' title='Submit this to Meneame'/>
</li>
<li class='sexy-misterwong'>
<a class='external' expr:href='&quot;http://www.mister-wong.com/addurl/?bm_url=&quot; + data:post.url + &quot;&amp;bm_description=&quot; + data:post.title + &quot;&amp;plugin=sexybookmarks&quot;' rel='nofollow' title='Add this to Mister Wong'/>
</li>
<li class='sexy-mylinkvault'>
<a class='external' expr:href='&quot;http://www.mylinkvault.com/link-page.php?u=&quot; + data:post.url + &quot;&amp;n=&quot; + data:post.title ' rel='nofollow' title='Store this link on MyLinkVault'/>
</li>
<li class='sexy-myspace'>
<a class='external' expr:href='&quot;http://www.myspace.com/Modules/PostTo/Pages/?u=&quot; + data:post.url + &quot;&amp;t=&quot; + data:post.title ' rel='nofollow' title='Post this to MySpace'/>
</li>
<li class='sexy-netvibes'>
<a class='external' expr:href='&quot;http://www.netvibes.com/share?title=&quot; + data:post.title + &quot;&amp;url=&quot; + data:post.url ' rel='nofollow' title='Submit this to Netvibes'/>
</li>
<li class='sexy-netvouz'>
<a class='external' expr:href='&quot;http://www.netvouz.com/action/submitBookmark?url=&quot; + data:post.url + &quot;&amp;title=&quot; + data:post.title + &quot;&amp;popup=no&quot;' rel='nofollow' title='Submit this to Netvouz'/>
</li>
<li class='sexy-newsvine'>
<a class='external' expr:href='&quot;http://www.newsvine.com/_tools/seed&amp;save?u=&quot; + data:post.url + &quot;&amp;h=&quot; + data:post.title ' rel='nofollow' title='Seed this on Newsvine'/>
</li>
<li class='sexy-ning'>
<a class='external' expr:href='&quot;http://bookmarks.ning.com/addItem.php?url=&quot; + data:post.url + &quot;&amp;T=&quot; + data:post.title ' rel='nofollow' title='Add this to Ning'/>
</li>
<li class='sexy-pingfm'>
<a class='external' expr:href='&quot;http://ping.fm/ref/?link=&quot; + data:post.url + &quot;&amp;title=&quot; + data:post.title + &quot;&amp;body=&quot;' rel='nofollow' title='Ping this on Ping.fm'/>
</li>
<li class='sexy-plaxo'>
<a class='external' expr:href='&quot;http://www.plaxo.com/?share_link=&quot; + data:post.url ' rel='nofollow' title='Share this on Plaxo'/>
</li>
<li class='sexy-plurk'>
<a class='external' expr:href='&quot;http://www.plurk.com/m?content=9+beautiful+web+forms+for+free+download+-+&quot; + data:post.url + &quot;&amp;qualifier=shares&quot;' rel='nofollow' title='Share this on Plurk'/>
</li>
<li class='sexy-printfriendly'>
<a class='external' expr:href='&quot;http://www.printfriendly.com/print?url=&quot; + data:post.url ' rel='nofollow' title='Send this page to Print Friendly'/>
</li>
<li class='sexy-slashdot'>
<a class='external' expr:href='&quot;http://slashdot.org/bookmark.pl?url=&quot; + data:post.url + &quot;&amp;title=&quot; + data:post.title ' rel='nofollow' title='Submit this to SlashDot'/>
</li>
<li class='sexy-sphinn'>
<a class='external' expr:href='&quot;http://sphinn.com/index.php?c=post&amp;m=submit&amp;link=&quot; + data:post.url ' rel='nofollow' title='Sphinn this on Sphinn'/>
</li>
<li class='sexy-techmeme'>
<a class='external' expr:href='&quot;http://twitter.com/home/?status=Tip+@Techmeme+&quot; + data:post.url + &quot;--&quot; + data:post.title + &quot;&amp;source=Way2blogging&quot;' rel='nofollow' title='Tip this to TechMeme'/>
</li>
<li class='sexy-tipd'>
<a class='external' expr:href='&quot;http://tipd.com/submit.php?url=&quot; + data:post.url ' rel='nofollow' title='Share this on Tipd'/>
</li>
<li class='sexy-way2blogging'>
<a class='external' href='http://way2blogging.blogspot.com' rel='follow' title='Grab this Widget'/>
</li>
<li class='sexy-way2blogging'>
<a class='external' href='http://www.spiceupyourblog.com' rel='follow' title='Social Bookmarking Gadgets'/>
</li>
</ul>
<div class='sexy-link'>
Widget for blogger by <a href='http://howtoalltools.blogspot.com/2012/10/new-and-complete-animated-sexy-social.html' rel='follow' title='Grab this Widget'>How To All Tools</a>
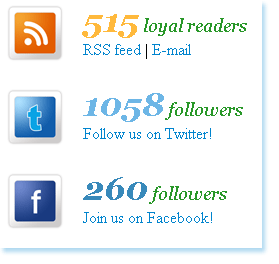
 </div>
</div>
</div>
</b:if>
<!--end bookmarks-->

The Options

The line in red at the top sets the gadget to only be displayed on full posts pages not on the home page.To display the gadget on your home page also remove the line in red and Important if you look the the bottom of the code you will see </b:if> in red, this is the closing tag so remove this also.

The width is highlighted in blue at 550px and can be changed to suit your blog.

Change The Arrow Message

To change the arrow message simple change the line highlighted in yellow above with one of the lines below.Currently the message is Sharing Is Sexy.

Sharing Is Sexy Bookmark Arrow Message

sexy-bookmarks-bg-sexy

Sharing Is Caring Hearts Bookmark Arrow Message

sexy-bookmarks-bg-caring

Sharing Is Caring Bookmark Arrow Message

sexy-bookmarks-bg-caring-old

Share The Love Bookmark Arrow Message

sexy-bookmarks-bg-love

Share The Wealth Bookmark Arrow Message

sexy-bookmarks-bg-wealth

Share And Enjoy Bookmark Arrow Message

sexy-bookmarks-bg-enjoy

Share The Knowledge Bookmark Arrow Message

sexy-bookmarks-bg-knowledge

German Bookmark Arrow Message

sexy-bookmarks-bg-german

How about a different message every day ?

Your Done this ...! Always comment and like us.....